

Do you want to sell products online and build a successful eCommerce store without breaking the bank? Congratulations! You are at the right place.
In this guide, I will show you how to set up an online store using WooCommerce, the world’s most popular eCommerce plugin for WordPress. This gives you great flexibility and control to create your dream store whether you are a solopreneur, small-business owner, or just plain curious about passive income.
Okay, let us jump right into it!
 What actually is WooCommerce?
 What actually is WooCommerce?
WooCommerce is precisely that free add-on plugin with which you can convert your website into a functional online shop. If you use WooCommerce in your pages, you can sell real or virtual goods, handle stock, securely accept payments, etc. The whole process can be managed completely in your dashboard.
Open source, developer friendly, used by millions around the world.
Necessary Steps Before You Start
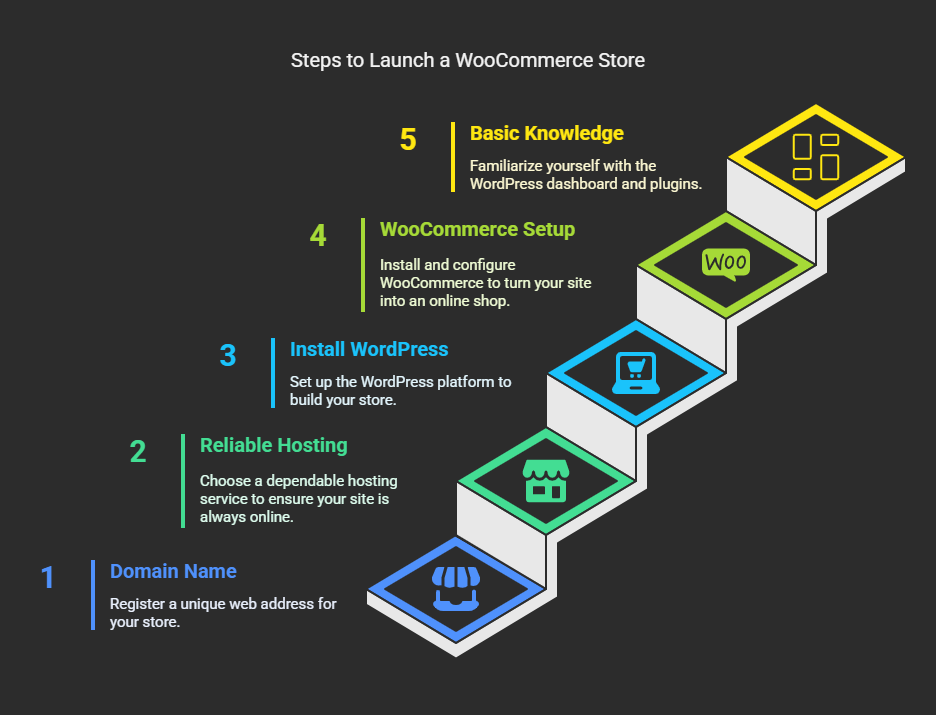
Here is something you need before building your store:
➢Domain name (for example, yourstore.com)
➢Reliable hosting plan: Bluehost, SiteGround, or Cloudways.
➢Installed WordPress
➢Basic knowledge of WordPress dashboard and plugins
Now lets break this into steps.
 Step 1: Get Domain and Hosting
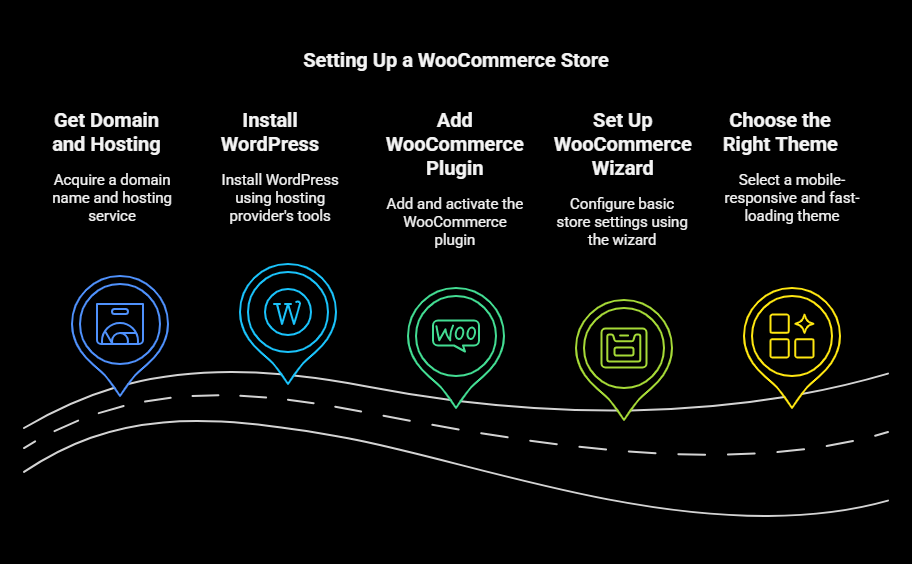 Step 1: Get Domain and Hosting
Basically, the domain is the online name for your store and hosting is where your website will be stored.
Recommended Hosting Service Provisions for WooCommerce:
➢Bluehost WooCommerce Hosting – friendly to beginners and officially suggested by WordPress
➢SiteGround – ultra-fast with big WooCommerce optimization
➢Cloudways – the most advanced and scalable, best for growing stores
💡 Pro Tip: Choose a hosting plan that offers free SSL and WooCommerce pre-installed.
Step 2: Install WordPress
Usually, hosting providers will offer 1-click WordPress installation. If you have a managed WooCommerce-type plan (Bluehost, for example), the host will have been installing WordPress for you.
Once installed, go to:
Log in to your WordPress dashboard – your new store’s HQ. 🎯
Step 3: Add the WooCommerce Plugin
➢Access the dashboard of your WordPress account and visit Plugins > Add New
➢Now, search for “WooCommerce.”
➢For installation, click Install Now and then Activate.
WooCommerce will then automatically launch the setup wizard once it is activated.
Step 4: Set Up WooCommerce Wizard
This wizard will help you set up the basic defined settings for your store:
➢Store Details – address, currency, etc
➢Industry– Choose your industry niche eg. fashion, food
➢Type of Product– Physical, digital, or subscriptions
➢Business Details – Number of products for sale across locations
➢Theme Setup– Choose a free theme or skip for now
You may come back to make changes at any time under WooCommerce > Settings.
Step 5: Choose the Right Theme
A good theme is one with an attractive design with a fast-loading speed that works seamlessly with WooCommerce.
Top WooCommerce themes (both free and paid):
➢Astra– very lightweight and great loading speed
➢OceanWP– plenty of features and customizable options
➢Storefront– WooCommerce Official theme
➢Flatsome– premium theme with drag and drop builder
💡 Choose a mobile-responsive theme for a better user experience (and SEO!).
 Step 6: Add Your Products:
 Step 6: Add Your Products:
Let us proceed to the fun parts—adding products!
➢Go to Products > Add New.
➢Enter name and description for the product.
➢Set the product type: Simple, Variable, Grouped, Downloadable.
➢Set up price, product images, categories, tags, and stock.
➢Publish!
Example Product Fields:
➢Title: Organic Green Tea
➢Price: $9.99.
➢Category: Beverages.
➢Tags: organic, tea, green.
➢Image: Upload high-quality photograph.
📷 Use optimized images for faster loading.
Step 7: Configure Payment Gateways
WooCommerce has built-in payment methods:
Popular Payment Options:
➢PayPal
➢Stripe
➢Direct Bank Transfer
➢Cash on Delivery
➢Razorpay (for India)
To set them up:
➢Go to WooCommerce > Settings > Payments
➢Enable your preferred payment methods
➢Connect your accounts
💡 Use Stripe for easy credit/debit card payments.
Step 8: Shipping Configuration
Shipping arrangements depend on the destination and the nature of the products.
➢Go to WooCommerce > Settings > Shipping. From there:
➢Add shipping zones (for example, US, Europe)
➢Define shipping methods (Flat rate, Free shipping, Local pickup)
➢Set rates and rules
Optional: For extensive features, you can also add plugins like Table Rate Shipping or WooCommerce Shipping.
Step 9: Managing Taxes:
WooCommerce contains some tax settings that can be enabled.
➢Go to WooCommerce>>Settings>>General
➢Check the Enable tax box
➢Then go to the tax tab to configure rates.
Then you can choose:
➢Tax-inclusive or exclusive prices?
➢Standard rates for different countries or regions?
Pro plugin suggestion: TaxJar or Avalara, which automatically calculates sales tax.
 Step 10: Customize Your Store Pages
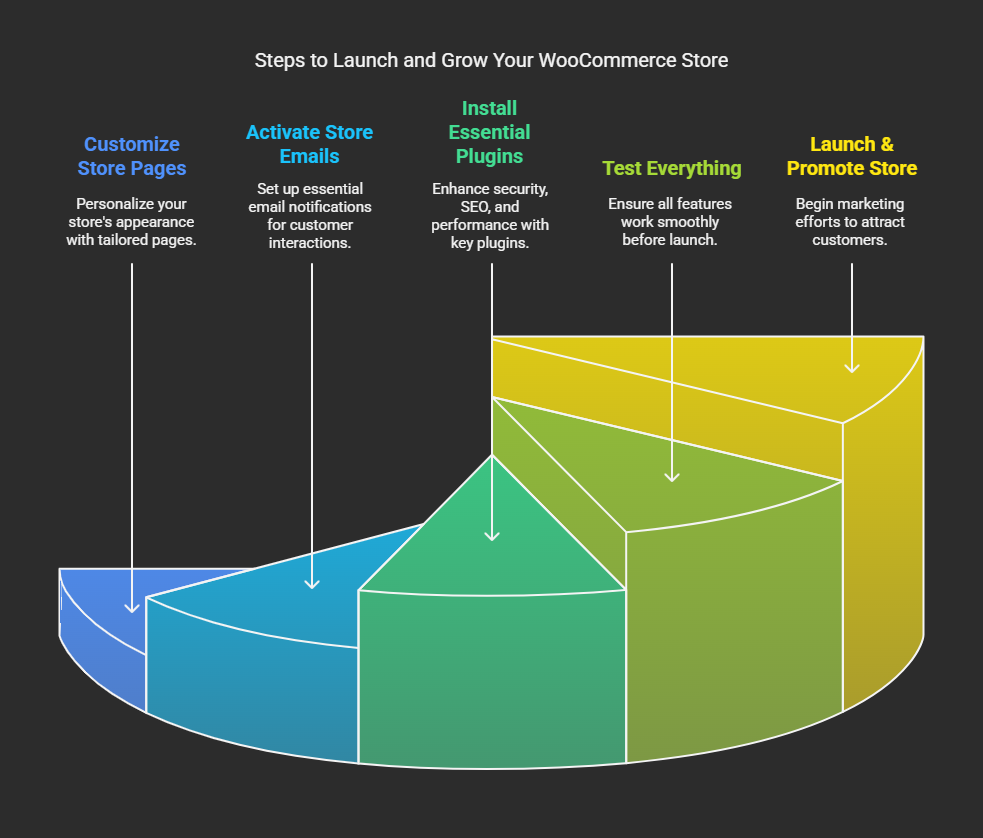 Step 10: Customize Your Store Pages
WooCommerce will automatically create pages like:
➢Shop
➢Cart
➢Check out
➢My Account
You can edit them by means of:
➢Block Editor (Gutenberg), or by,
➢Elementor (recommended especially for newbies),
➢Beaver Builder, or WPBakery.
Add excitement to the homepage with featured products, banners, and CTAs.
Step 11: Activate Store Emails
Email notifications for order confirmations, shipment alerts, and so on.
These are accessible under WooCommerce > Settings > Emails.
Customize templates or use a plugin like:
➢Kadence WooCommerce Email Designer
➢MailPoet for email marketing
Step 12: Install Essential WooCommerce Plugins
Here are the essential plugins for growth and optimization:
Security:
➢Wordfence
➢MYJ Security (if you’re building your own plugin – go for it!)
SEO Marketing:
➢Rank Math or Yoast SEO
➢Mailchimp or MailPoet
➢Google Site Kit
Speed Performance:
➢WP Rocket or LiteSpeed Cache
➢Smush or ShortPixel for image optimization
Analytics:
➢MonsterInsights
➢Google Analytics Plugin
Step 13: Test Everything
Before going lives, verify the following:
➢Can customers place orders?
➢Do emails generate notifications?
➢Can gateways receive payments?
➢Is the website mobile responsive?
If you must test new updates, use staging environments (for example, with WP Staging) to avoid breaking live sites.
Step-14 to Launch & Promote Your Store
Now is the time when you are pretty much sure about everything!
Start promoting:
➢Post on social media
➢Google ads/Facebook ads
➢Create a blog to generate organic traffic
➢Offer discounts and coupons on the first order
➢Use influencer marketing
🎯 Bonus: Add tracking codes for Facebook Pixel and Google Ads Conversion Tracking to monitor campaigns.
Pro Tips to Grow Your WooCommerce Store
➢Set up Live Chat (e.g., Tawk.to, LiveChat)
➢Put Up Product Reviews and Social Proof
➢Recovery of Abandoned Carts (e.g., CartFlows, Retainful)
➢Create a Sense of Urgency with Time-Limited Offers
➢Offer Loyalty Points or Referral Rewards
➢Continue Optimizing for Better User Experience
Conclusion:
Transforming your passion into a well-sustained business using WooCommerce is made easy. Not only is it scalable and powerful, but most importantly, it all belongs to you.
Following the simple steps above, you can easily move from an empty WordPress site to starting set-up of WooCommerce in a matter of hours.
What are you waiting for? The e-commerce empire begins now.
Any queries or stuck somewhere? Drop them in the comments below – would love to help you out!